How Did GitHub Profile READMEs Become the Best? Find out.
GitHub Profile READMEs are essentially a snapshot of who you are. From creative profiles to interactive games, you can pretty much represent yourself.
It takes just a glance, maybe three seconds, for someone to evaluate you when they see your profile or portfolio for the first time. In this short time, the other person views you based on your personality, creativity, taste, activities, and many more.
A person who has a relationship with technology might frequently visit a famous place called GitHub. A platform where more than 50 million people learn, share and work together to build software. It lets you and other work together on projects from anywhere and also contribute to the open-source projects.
With the introduction of Profile READMEs, GitHub is now a one-stop-shop for not only showing off your tech skills and coding prowess but also anything else you might want to share about yourself.
Think of it as a creative portfolio, personal website, and expressive canvas all rolled into one. Plus, all your code is there as well!
If you use GitHub to impress recruiters, friends, or anyone else coming across a GitHub profile, creating a profile README is the perfect way to stand out!
This article will show you how to create a badass one and make it stand out using some cool tricks and tools!
What is a GitHub README? 🤷
It's the first canvas anyone sees in a repository. README files typically include information about the project, and each repository should have one. How users can use the project and contribute to the project is some good content from READMEs.
What is a GitHub Profile README? 🙄
GitHub Profile README can be used to inform people of more information about ourselves. You can show off your hobbies, your sense of humor, and many awesome personality traits. It’s the best way to stand out from the rest of the Github community!
It also supports markdown, which means that we can add lots of fun stuff with HTML, emojis, GIFS, pictures, and many more.
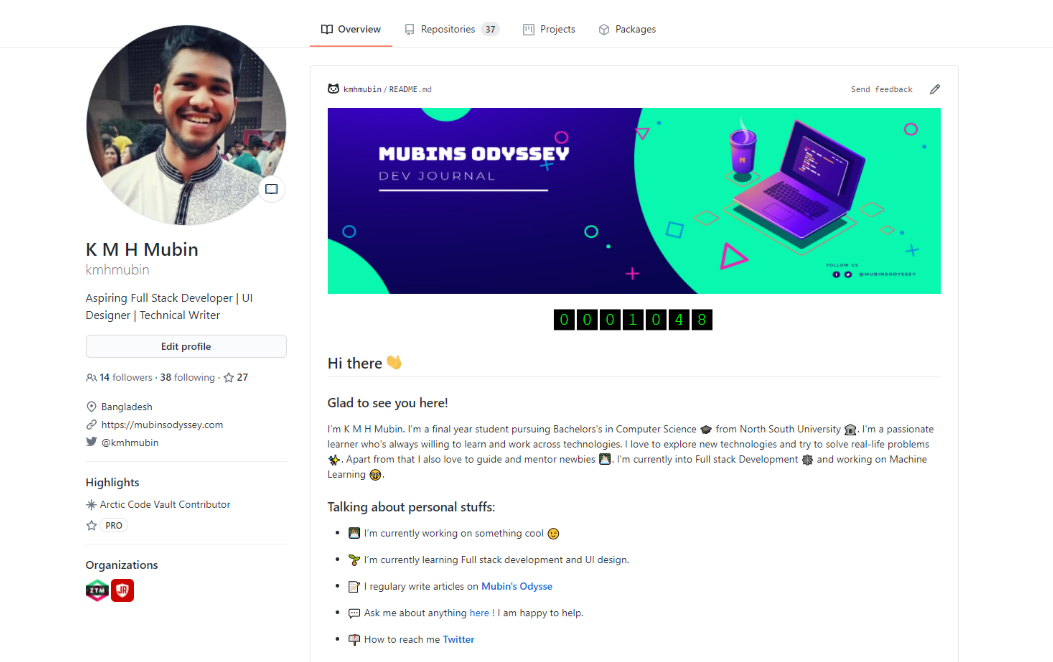
👀 A sneak peek of my GitHub Profile README.
Create your own Profile README ➕
I'm assuming that you already have an account on GitHub. Creating GitHub Profile README is very simple, but you probably would not find it on your own.
- To create it, go to https://github.com/new when you want to create a normal repository.
- Name the repository with your username - in my case, that would be
kmhmubin/kmhmubin.
As soon as you type it in, you will be greeted with a message telling you about this secret repository.

Fig: Creating GitHub Profile README
NOTE: As I have already created the repo hence it's showing “The repo already exists.”
Ensure your repository is Public and Initialize this repository with a README file and .gitignore file.
That’s it! GitHub does the rest of the work for you! A README.md
will automatically be generated in this special repository. Github renders that file at the top of your Github Profile, above your pinned repositories and activity.
Clone your Repository 📇
Now clone your new repository; it will help us to edit and test the README locally as much as we want.
To clone the repository, click the Green Button called Code. It will give us a link to download the repository. Please copy the link because we need it later.

Fig: Copy your GitHub Profile repo link
We will use the GitKraken Git GUI tool. You can use the terminal if you want to. Now open the Git Kraken on your pc. Sign in to Git Kraken by using GitHub Account.
- Click Clone a repo option from Git Kraken.

Fig: Clone the GitHub Profile repo
- Select GitHub and search your repository name and select the clone it button. It will start to clone your Profile repo on your local pc.

Fig: selecting your Profile repo
Organize your repository folder 🧱
Go to the directory where you save your local version of the Profile repo. Here is an example of my repo directory.
Note: Make sure hidden items option enable

Fig: local profile repo
Here is the folder structure at a glance.
kmhmubin:.
|   .gitignore
|   GitHub-Profile-Cover.jpg
|   LICENSE
|   README.md
|
+---.github
|   \---workflows
|           blog-post-workflow.yml
|           topFollowers.yml
|           waka-readme.yml
|
+---assets
|       dev.svg
|       facebook.svg
|       hashnode.svg
|       instagram.svg
|       linkedin.svg
|       mubinsodyssey.svg
|       twitter.svg
|
\---src
        getTopFollowers.py
By default, when you clone your repo, it only contains 3 files or folder; those are .git, .gitignore, and README.md Except for those, you need to create 3 more folders.
- assets: In this folder, you save your images, GIFs, and icons.
- src: In this folder, you create a Python script named
getTopFollowers.py. This script allows you to show your top followers. - .github/workflows: In this folder, store your workflow files. Workflow files use YAML syntax and must have either a
.ymlor.yamlfile extension.
If you're new to YAML and want to learn more, see "Learn YAML in five minutes."
Commit your changes and push those files to your GitHub Repository.
Personalize your Profile README 👨🎨
Just as with a personal website, Profile READMEs are essentially a snapshot of who you are. The options are endless. From creative profiles to interactive games, you can pretty much represent yourself however you want!
Here I'm going to complete one step at a time and commit these changes. You can follow along with me. At first, open your README.md file in an editor like VS CODE or Sublime Text.
📌 Cover Photo
I would suggest adding a nice header to make it more personalized. You can include a custom cover photo. You can make a cover photo in canva with 1920 x 583 px resolution. Save your cover photos on your GitHub repo and copy the link. Here is an example code:


Fig: Adding a cover photo
📌 Live visitor counter
I wanted to see if I could make my profile look a little bit of fun. So I added a live visitor counter to see how many people visit my GitHub Profile. I choose the Retro visitor counter cause I look good with my cover photo. Here's the example code:
<!-- retro visitor counter -->
<p align="center">
  <img src="https://profile-counter.glitch.me/{user-name}/count.svg" />
</p>
Change the {user-name} to your username in the URL like this:
https : //profile-counter.glitch.me/songoku/count.svg
The preview will look like this. PS: count number starts with zero.

Fig: Adding retro visitor counter
To learn more about the Retro visitor counter by Ryan Lanciaux check out his article.
📌 Welcome message with Gifs
Sayin hi with emoji looks impressive, but if you add a cool gif, it looks more expressive. So I'm adding a hand waving gifs with my welcoming text.
<!-- welcome message -->
<h2>Hi there <img src="https://media.giphy.com/media/hvRJCLFzcasrR4ia7z/giphy.gif" width="25px"></h2>

<h3>Glad to see you here!</h3>
It's really looking more lively than a simple emoji.

Fig: Adding Hand waving Gifs
📌 About yourself
In this section, you can add a bit of you, who you are, what you are doing, or what you are learning. You can add fun facts, jokes, etc.
📌 Social Links
You should definitely include some contact information in your profile, whether it’s an email, Twitter handle, LinkedIn, or other social media. Whichever you chose to include, you might want to use icon links to make it easier for people to find/notice.
You can download free icons from Iconscout. If you need to edit any icons, you can do it by their icon editor. After downloading all the social icons, upload it to your GitHub repo. And copy all these links and add to your README. Here is an example
<!-- Connect with me -->
<h3 align="left">Connect with me:</h3>
<p align="left">

<a href="https://twitter.com/kmhmubin" target="blank"><img align="center" src="https://github.com/kmhmubin/kmhmubin/blob/master/assets/twitter.svg" alt="kmhmubin" height="30" width="30" /></a>
<a href="https://linkedin.com/in/kmhmubin" target="blank"><img align="center" src="https://github.com/kmhmubin/kmhmubin/blob/master/assets/linkedin.svg" alt="kmhmubin" height="30" width="30" /></a>
<a href="https://fb.com/kmhmubin" target="blank"><img align="center" src="https://github.com/kmhmubin/kmhmubin/blob/master/assets/facebook.svg" alt="kmhmubin" height="30" width="30" /></a>
<a href="https://instagram.com/kmhmubin" target="blank"><img align="center" src="https://github.com/kmhmubin/kmhmubin/blob/master/assets/instagram.svg" alt="kmhmubin" height="30" width="30" /></a>
<a href="https://hashnode.com/@kmhmubin" target="blank"><img align="center" src="https://github.com/kmhmubin/kmhmubin/blob/master/assets/hashnode.svg" alt="kmhmubin" height="30" width="30" /></a>
<a href="https://dev.to/kmhmubin" target="blank"><img align="center" src="https://github.com/kmhmubin/kmhmubin/blob/master/assets/dev.svg" alt="kmhmubin" height="30" width="30" /></a>
<a href="https://mubinsodyssey.com" target="blank"><img align="center" src="https://github.com/kmhmubin/kmhmubin/blob/master/assets/mubinsodyssey.svg" alt="mubinsodyssey" height="30" width="30" /></a>

</p>

Fig: Adding Social Links
📌 Languages and Tools
This section shows which programming languages you are using and what tools are used every day. We will generate those icons from GitHub Profile Readme Generator or download all those programming languages icons all by yourself and upload them to your GitHub repo, which will take a long time can add shields.io badges. To add those icons, we are going to use shortcuts.😅
- Go to GitHub Profile README Generator website.
- Select the programming icons that you use and hit the generate button.
Copy all those links and add them to your readme like this.
<h3 align="left">Languages and Tools:</h3>
<p align="left"> <a href="https://www.cprogramming.com/" target="_blank"> <img src="https://devicons.github.io/devicon/devicon.git/icons/c/c-original.svg" alt="c" width="40" height="40"/> </a> <a href="https://developer.mozilla.org/en-US/docs/Web/JavaScript" target="_blank"> <img src="https://devicons.github.io/devicon/devicon.git/icons/javascript/javascript-original.svg" alt="javascript" width="40" height="40"/> </a> <a href="https://www.python.org" target="_blank"> <img src="https://devicons.github.io/devicon/devicon.git/icons/python/python-original.svg" alt="python" width="40" height="40"/> </a> <a href="https://reactjs.org/" target="_blank"> <img src="https://devicons.github.io/devicon/devicon.git/icons/react/react-original-wordmark.svg" alt="react" width="40" height="40"/> </a>
</p>

Fig: Adding Languages and Tools
📌 Latest Blog Posts
Show your latest blog posts from any sources on your GitHub profile/project readme automatically using the RSS feed using this GitHub Action. To show your blog post follow those steps.
- Create a folder named
.githuband create aworkflowsfolder inside it. - Create a new file named
blog-post-workflow.ymlwith the following contents inside the workflows folder:
name: Latest blog post workflow
on:
  schedule: # Run workflow automatically
    - cron: '0 * * * *' # Runs every hour, on the hour
  workflow_dispatch: # Run workflow manually (without waiting for the cron to be called) through the Github Actions Workflow page directly
jobs:
  update-readme-with-blog:
    name: Update this repo's README with the latest blog posts
    runs-on: ubuntu-latest
    steps:
      - uses: actions/checkout@v2
      - uses: gautamkrishnar/blog-post-workflow@master
        with:
          feed_list: "https://dev.to/feed/kmhmubin,https://mubinsodyssey.com/rss.xml"
- Replace the above URL list with your own RSS feed URLs. See popular-sources for a list of common RSS feed URLs.
- Go back to your README.md file.
- Add the following section to your README.md file; you can give whatever title you want. Just make sure that you use in your readme. The workflow will replace this comment with the actual blog post list:
# Blog posts
<!-- BLOG-POST-LIST:START -->
<!-- BLOG-POST-LIST:END -->
- Commit and wait for it to run automatically or trigger it manually to see the result instantly.
To trigger the workflow manually, please follow the steps:
- Go to your GitHub Profile Repo.
- Click on the Action tab from your repo.
- Select the option name
Latest blog post workflowand clickrun workflowbutton.

Fig: Trigger the workflow manually
It will run the workflow and show the blog post from your website.

Fig: Blog posts shows
To learn more about Blog post workflow, check out this repo by Gautam Krishna R.
📌 WakaTime Weekly Metrics
WakaTime gives you an idea of the time you really spent on coding. This helps you boost your productivity and competitive edge. To show your waka time stats follow those steps:
- Add a comment to your README.md like this:
<!--START_SECTION:waka-->
<!--END_SECTION:waka-->
- Head over to https://wakatime.com and create an account if you don't have.
- Get your WakaTime API Key from your Account Settings in WakaTime.

Fig: Wakatime API key
- You'll need a GitHub API Token with
repoanduserscope from here.

Fig: selecting repo and user scope

Fig: Creating a GitHub API token
- Copy the API Token and head back to your Profile README repo.
You need to save the WakaTime API Key and the GitHub API Token in the repository secrets. You can find that in the Settings of your repository. Be sure to save those like the following.
- WakaTime API Key as
WAKATIME_API_KEY=<your wakatime API Key> GitHub Personal Access Token as
GH_TOKEN=<your GitHub access token>.
Fig: Adding API & Token to repository secret
- WakaTime API Key as
Create a folder named
.githuband create aworkflowsfolder inside it.Create a new file named
waka-readme.ymlwith the following contents inside the workflows folder:name: Waka Readme on: schedule: # Runs at 12am IST - cron: '30 18 * * *' jobs: update-readme: name: Update Readme with Metrics runs-on: ubuntu-latest steps: - uses: anmol098/waka-readme-stats@master with: WAKATIME_API_KEY: ${{ secrets.WAKATIME_API_KEY }} GH_TOKEN: ${{ secrets.GH_TOKEN }}Commit and wait for it to run automatically, or you can also trigger it manually to see the result instantly.
By default, all flags are enabled; if you want to disable some of these flags, add a False value end of the flags. Here is an example:
  name: Waka Readme

  on:
    schedule:
      # Runs at 12am IST
      - cron: '30 18 * * *'

  jobs:
    update-readme:
      name: Update Readme with Metrics
      runs-on: ubuntu-latest
      steps:
        - uses: anmol098/waka-readme-stats@master
          with:
            WAKATIME_API_KEY: ${{ secrets.WAKATIME_API_KEY }}
            GH_TOKEN: ${{ secrets.GH_TOKEN }}
SHOW_PROJECTS: "False"
SHOW_COMMIT: "False"
SHOW_PROFILE_VIEWS: "False"
SHOW_LINES_OF_CODE: "False"
SHOW_DAYS_OF_WEEK: "False"
SHOW_SHORT_INFO: "False"
SHOW_LOC_CHART: "False"
SHOW_LANGUAGE_PER_REPO: "False"
To learn more about waka time readme stats by Anmol Pratap Singh.
📌 GitHub Stats
GitHub Readme Stats is a tool that allows you to generate GitHub stats for your contributions and repositories and attach them to your README. GitHub profile is really just a place to showcase your repositories and highlight your activity/contributions. To show your dynamically generated GitHub stats on your readme, follow those steps:
- Copy-paste this into your markdown content, and that's it. Simple! Change the
?username=value to your GitHub's username. - Here, we are showing GitHub Statistics and Most used languages side by side.
<!-- GitHub stats -->
<b>⚡ My Dev Statistics</b>

<p>
<!-- GitHub Stats -->
<img height="180em" src="https://github-readme-stats.vercel.app/api?username=kmhmubin&show_icons=true&hide_border=true" />

<!-- Most Used Languages -->
<img height="180em" src="https://github-readme-stats.vercel.app/api/top-langs/?username=kmhmubin&exclude_repo=KNN-Image-Classification&show_icons=true&hide_border=true&layout=compact&langs_count=8"/>
</p>

Fig: Showing GitHub Stats
You can change the theme and color style however you want. To change color or theme, then check out this repo.
📌 My follower section
You can dynamically generate your GitHub followers. It's enjoyable to see who is following you. To show your dynamically generated follower on your readme, follow those steps:
- Create a new folder name
srcinside your repository. - Create a new file named
getTopFollowers.pywith the following contents inside thesrcfolder:
"""
   Copyright 2020 Yufan You <https://github.com/ouuan>

   Licensed under the Apache License, Version 2.0 (the "License");
   you may not use this file except in compliance with the License.
   You may obtain a copy of the License at

       http://www.apache.org/licenses/LICENSE-2.0

   Unless required by applicable law or agreed to in writing, software
   distributed under the License is distributed on an "AS IS" BASIS,
   WITHOUT WARRANTIES OR CONDITIONS OF ANY KIND, either express or implied.
   See the License for the specific language governing permissions and limitations under the License.
"""

import requests
import sys
import re

if __name__ == "__main__":
    assert(len(sys.argv) == 4)
    handle = sys.argv[1]
    token = sys.argv[2]
    readmePath = sys.argv[3]

    headers = {
        "Accept": "application/vnd.github.v3+json",
        "Authorization": f"token {token}"
    }

    followers = []

    for i in range(1, 100000):
        page = requests.get(f"https://api.github.com/users/{handle}/followers?page={i}&per_page=100", headers = headers).json()
        if len(page) == 0:
            break
        for follower in page:
            info = requests.get(follower["url"], headers = headers).json()
            if info["following"] > 5000 and info["public_repos"] < 50:
                print(f"Ignored: https://github.com/{info['login']} with {info['followers']} followers and {info['following']} following")
                continue
            followers.append((info["followers"], info["login"], info["id"], info["name"] if info["name"] else info["login"]))
            print(followers[-1])

    followers.sort(reverse = True)

    html = "<table>\n"

    for i in range(min(len(followers), 14)):
        login = followers[i][1]
        id = followers[i][2]
        name = followers[i][3]
        if i % 7 == 0:
            if i != 0:
                html += "  </tr>\n"
            html += "  <tr>\n"
        html += f'''    <td align="center">
      <a href="https://github.com/{login}">
        <img src="https://avatars2.githubusercontent.com/u/{id}" width="100px;" alt="{login}"/>
      </a>
      <br />
      <a href="https://github.com/{login}">{name}</a>
    </td>
'''

    html += "  </tr>\n</table>"

    with open(readmePath, "r") as readme:
        content = readme.read()

    newContent = re.sub(r"(?<=<!\-\-START_SECTION:top\-followers\-\->)[\s\S]*(?=<!\-\-END_SECTION:top\-followers\-\->)", f"\n{html}\n", content)

    with open(readmePath, "w") as readme:
        readme.write(newContent)
- Go back to your README.md file.
- Add the following section to your README.md file; you can give whatever title you want. Just make sure that you use <!--START_SECTION:top-followers—> <!--END_SECTION:top-followers—> in your readme. The workflow will replace this comment with the actual blog post list:
# My followers
<!--START_SECTION:top-followers-->
<!--END_SECTION:top-followers-->
- Go back to the
**.github** folder. - Create a new file named
topFollowers.ymlwith the following contents inside the workflows folder:
name: Get Top Followers

on:
  push:
    branches:
      - master
  schedule:
    - cron: '0 20 * * *'

jobs:
  top-followers:
    runs-on: ubuntu-latest
    steps:
      - uses: actions/checkout@v2
      - name: Setup python
        uses: actions/setup-python@v2
        with:
          python-version: 3.8
      - name: Install requests
        run: pip install requests
      - name: Update README
        run: python src/getTopFollowers.py ${{ github.repository_owner }} ${{ secrets.GITHUB_TOKEN }} README.md
      - name: Commit changes
        run: |
          git config --local user.email "action@github.com"
          git config --local user.name "GitHub Action"
          git add -A
          git diff-index --quiet HEAD || git commit -m "Update top followers"
      - name: Pull changes
        run: git pull -r
      - name: Push changes
        uses: ad-m/github-push-action@master
        with:
          github_token: ${{ secrets.GITHUB_TOKEN }}
- Commit and wait for it to run automatically, or you can also trigger it manually to see the result instantly.

Fig: Top Follower Preview
This Python Scripts originally developed by Yufan You, so check him out.
Congratulation! 🎉🎊 You have successfully created your GitHub Profile README.
Conclusion 💯
From awesome photography to cool GIFs to Spotify “Now Playing” badges… pretty much anything goes. It doesn’t have to be crazy or complicated. Some of the coolest profiles are quite simple.
These are just some of the creative ideas I’ve seen… the world is your oyster. Take advantage of the profile to show off your personality. Make it concise, be creative, and original, but most importantly, make it your own.
Resources 📚
- A basic guide to Markdown: Markdown cheatsheet
- Icons to make your README extraordinary: Iconscout.
- Emojis to make your README fun: Emojis guide
- Gifs to make your README lively: GIPHY
- Easy and customizable badges: Shields.io
- Resources for dynamic profile: Github Actions
- Some cool profile READMEs: Awesome READMEs
Check out my profile README if you’re interested and follow me on GitHub.
🚩👉 If it was useful to you, please Like/Share to reach others as well. Please hit the Subscribe button at the top of the page to get an email notification on my latest posts.
I talk about web development and UI design on Twitter @kmhmubin, come to talk with me there!
About the author
I am a developer from Bangladesh.
Comments
Join the discussionThank you very much, bro. I heard about github. But don't know what it actually is. Thanks for sharing information.
Welcome😉
Wonderful! There are so many awesome tools to put on. One more I would recommend adding it GitHub README Streak Stats.
Yeah! This is an awesome tool.🤩 Thanks for recommending it.


